How are Solar Panels Attached to a Shingle Roof: The Ultimate Guide
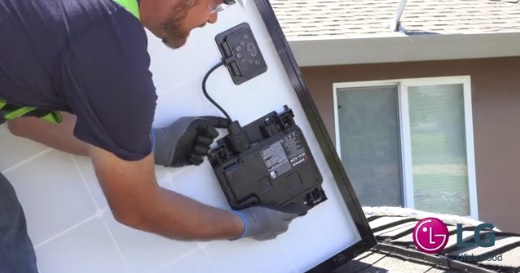
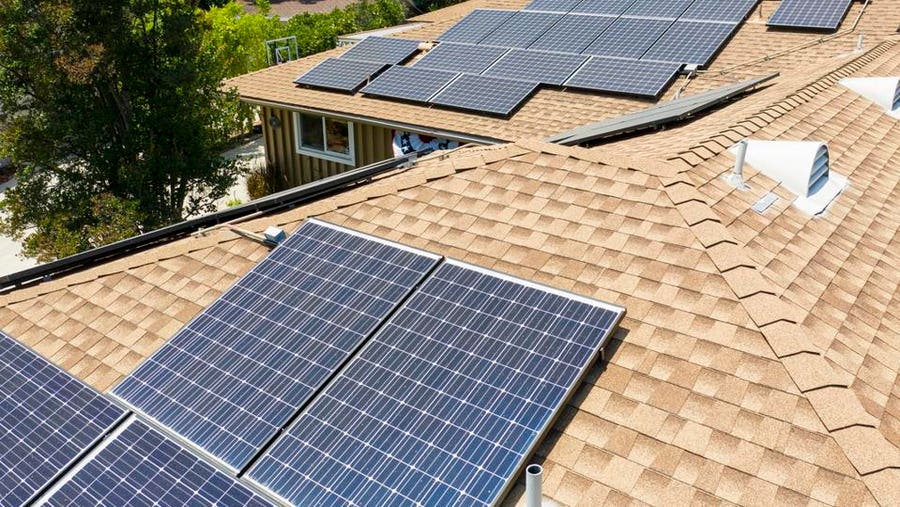
Solar panels are attached to a shingle roof using a lag bolt and flashing to secure the panels and racking system to the rafters, with a piece of flashing underneath the shingle to prevent leaks. In the installation of solar panels on a shingle roof, it is crucial to ensure proper attachment without compromising the integrity of the roof.
This involves using a lag bolt and flashing to secure the solar panels and the racking system to the rafters of the roof. Additionally, a piece of flashing is placed underneath the shingle to prevent any possibility of leakage. This method allows for a secure and reliable attachment of the solar panels to the shingle roof, ensuring maximum efficiency and durability.
Types Of Mounting Systems For Solar Panels
Roof-mounted solar panel systems are the most common and popular choice for residential installations. These systems are
installed directly on the roof of a building, utilizing the existing shingles or tiles as a foundation. Various mounting
options are available for roof-mounted systems, such as penetration-based mounts, ballasted mounts, and rail-based mounts.
Ground-mounted solar panel systems are suitable for installations where roof space is limited or the roof is not structurally
capable of supporting the weight of the solar panels. These systems are typically installed in open areas, such as
backyards or commercial lots, using racks or poles to elevate the panels off the ground. Ground-mounted systems offer
flexibility in terms of panel orientation and tilt angle, ensuring optimal solar exposure.
Floating solar panel systems are a relatively new and innovative approach to solar panel installation. These systems are installed
on bodies of water, such as ponds, lakes, or reservoirs. Floating solar panels offer several advantages, including reduced
land usage, increased energy production due to water cooling, and reduced evaporation of the water surface beneath the
panels. They are typically anchored in place using mooring systems to withstand wind and water currents.
Roof-mounted Solar Panel Systems
When it comes to installing solar panels on a shingle roof, one of the most common methods is using a roof-mounted system. Roof-mounted solar panel systems involve anchoring the panels directly onto the roof surface, providing an efficient and space-saving solution for harnessing solar energy. Let’s explore the installation process, considerations, and important components of such systems.
Installation Process And Considerations
The installation process of a roof-mounted solar panel system typically involves the following steps:
- Assessment and design: The roof area is evaluated to determine its suitability for solar panel installation. Factors such as roof orientation, shading, and structural integrity are taken into consideration during the design phase.
- Preparation: Prior to installation, the roof is inspected and any necessary repairs or reinforcements are made to ensure its durability and compatibility with the solar panel system.
- Racking system installation: Racking systems, which serve as the framework for mounting the solar panels, are securely attached to the roof using specialized mounting brackets or feet.
- Panel placement: Solar panels are then mounted onto the racking system and properly aligned to maximize exposure to sunlight.
- Electrical connection: Wiring is installed to connect the solar panels to the electrical system of the property, allowing the harvested solar energy to be utilized.
- System testing: Once the installation is complete, the system undergoes rigorous testing to ensure its functionality and efficiency.
During the installation process, it is important to consider factors such as roof condition, load-bearing capacity, and local building codes to ensure a safe and secure installation.
Racking systems and their importance
Racking Systems And Their Importance
Racking systems play a crucial role in roof-mounted solar panel installations. These systems provide the necessary support and stability for the panels, ensuring their optimum performance and longevity. Common types of racking systems include:
| Type | Description |
|---|---|
| Fixed-tilt racking systems | Designed at a fixed angle to maximize solar exposure throughout the year. |
| Tracking racking systems | Equipped with motorized mechanisms that allow the panels to follow the path of the sun, optimizing energy production. |
The selection of an appropriate racking system depends on factors such as roof space availability, budget, and desired energy output. Working with a professional installer can help determine the right racking system for your specific needs.
Flashing methods for shingle roofs
Flashing is a vital component of a roof-mounted solar panel system, especially for shingle roofs. It provides a watertight seal around the penetrations made for mounting the panels, preventing any potential leaks. There are several common flashing methods used for shingle roofs:
- L-brackets with flashing: L-brackets are attached to the racking system and sealed with flashing to create a waterproof barrier.
- Rooftop mounts with flashing: These mounts are specifically designed to integrate flashing into their structure, simplifying the installation process and enhancing the overall waterproofing.
- Flashing tape: A self-adhesive flashing tape is applied around the mounting points to create a secure seal against moisture.
Choosing the appropriate flashing method depends on factors such as roof type, climate conditions, and installer’s recommendation. Ensuring proper flashing installation is essential for maintaining the integrity of the roof and preventing any potential water damage.
Pros and cons of roof-mounted systems
Pros And Cons Of Roof-mounted Systems
Roof-mounted solar panel systems offer both advantages and disadvantages that are worth considering:
| Pros | Cons |
|---|---|
| Utilize existing roof space efficiently | May require roof modifications or repairs |
| Less obtrusive compared to ground-mounted systems | Potential for shading and reduced energy production due to roof orientation and nearby structures |
| Protection for the roof against weather elements | Access for maintenance and repair may be challenging |
Considering these pros and cons, it is important to assess your specific circumstances and consult with a professional installer to determine if a roof-mounted solar panel system is the right choice for you.
“`
This HTML-formatted content can be directly used in WordPress for the ‘Roof-Mounted Solar Panel Systems’ section of the blog post.
Flashing Methods For Shingle Roofs
When it comes to installing solar panels on a shingle roof, one crucial aspect that needs to be considered is the flashing. Flashing is a protective barrier that is installed around the edges of the solar panels to prevent water damage and ensure a watertight seal. In this section, we will provide an overview of roof flashing, a step-by-step guide on installing flashing for solar panels, discuss different types of flashing materials, and emphasize the importance of proper flashing for roof integrity.
Overview Of Roof Flashing
Roof flashing is an essential component of the solar panel installation process that helps to prevent leaks and ensure the long-term performance of the roof. It is typically made from durable materials such as aluminum or galvanized steel, which are resistant to weathering and corrosion. The primary function of flashing is to divert water away from critical areas, such as joints, intersections, and roof penetrations, where leaks are most likely to occur.
Step-by-step Guide On Installing Flashing For Solar Panels
When installing flashing for solar panels on a shingle roof, it is essential to follow a systematic approach to ensure a proper and secure installation. Here is a step-by-step guide on how to install flashing for solar panels:
- Begin by determining the placement of the solar panels on the roof and mark the locations accordingly.
- Clean the area surrounding the marked locations thoroughly, removing any dirt, debris, or existing flashing.
- Measure and cut the flashing material into appropriately sized pieces that align with the dimensions of the solar panels.
- Position the flashing over the marked locations and secure it in place using roofing nails or screws.
- Ensure that the flashing is tightly sealed against the roof, providing a watertight barrier.
- Repeat the above steps for each solar panel, leaving a small gap between the panels for expansion and contraction.
- Inspect the installed flashing to ensure that there are no gaps, cracks, or other signs of damage.
Different Types Of Flashing Materials
There are various types of flashing materials available for solar panel installations on shingle roofs. Some common options include:
| Flashing Material | Advantages | Disadvantages |
|---|---|---|
| Aluminum flashing | Durable, lightweight, and corrosion-resistant | Can be expensive compared to other materials |
| Galvanized steel flashing | Strong and cost-effective | Prone to rusting if not properly maintained |
| Bituminous flashing | Flexible and easy to work with | May deteriorate over time due to exposure to UV rays |
| PVC flashing | Waterproof and resistant to chemicals | Less heat resistant compared to other materials |
Importance Of Proper Flashing For Roof Integrity
Proper flashing is essential for maintaining the integrity of the roof and preventing water intrusion. Without adequate flashing, water can seep through gaps in the roof, leading to leaks, rot, and other structural damage. In addition to protecting the roof, proper flashing also helps to preserve the performance and efficiency of the solar panels, ensuring that they continue to generate electricity reliably for years to come.
Racking Systems For Roof-mounted Solar Panels
When it comes to installing solar panels on a shingle roof, one crucial aspect to consider is the type of racking system to be used. A racking system serves as the foundation for securely attaching solar panels to the roof, ensuring stability and longevity. In this article, we will delve into the different types of racking systems available, the factors to consider when choosing one, and the installation process and best practices.
Types Of Racking Systems Available
There are two primary types of racking systems used for mounting solar panels on shingle roofs:
- Adjustable racking systems
- Fixed racking systems
Adjustable Vs. Fixed Racking Systems
Adjustable racking systems offer the flexibility to tilt solar panels at various angles to optimize their exposure to sunlight throughout the day. These systems are ideal for locations with changing sun positions or environments where panel tilt angles need adjustment.
On the other hand, fixed racking systems have a static tilt angle, typically set based on the optimum angle for the specific location. These systems are less adjustable but often less expensive compared to their adjustable counterparts.
Factors To Consider When Choosing A Racking System
When selecting a racking system for a shingle roof-mounted solar panel installation, several critical factors should be taken into account:
- Roof Condition: Assess the roof’s structural integrity and ensure it can support the additional weight of the panels and racking system.
- Wind Load: Consider the wind load and the required strength of the racking system to withstand local weather conditions.
Roof Angle: Determine the optimal angle for solar panel installation based on the roof’s slope and sun exposure.- Roof Orientation: Take into consideration the direction the roof faces to maximize solar energy generation.
- Budget: Evaluate the cost-effectiveness of the racking system while ensuring it meets the necessary quality standards.
Installation Process And Best Practices
The installation of a racking system for roof-mounted solar panels involves several steps:
- Prepare the roof surface by cleaning and inspecting for any damage.
- Securely fasten the racking system to the roof using appropriate mounting hardware.
- Attach the solar panels to the racking system, ensuring proper alignment and spacing.
- Connect the wiring and perform the necessary electrical connections.
- Apply weatherproofing measures, such as flashing and sealants, to prevent leaks.
It is crucial to follow best practices during the installation process, such as ensuring proper grounding, securing all connections, and complying with local building codes and regulations. Working with a professional solar installer can help ensure a seamless and efficient installation.
Ground-mounted Solar Panel Systems
Ground-mounted solar panel systems are an excellent alternative for homeowners who don’t have adequate roof space or optimal roof orientation for solar panel installation. These systems are typically installed on the ground and offer various benefits and limitations compared to rooftop solar installations.
Benefits And Limitations Of Ground-mounted Systems
Benefits
- Flexibility in system size: Ground-mounted systems can accommodate larger solar arrays, allowing for increased energy production.
- Optimal sunlight exposure: Since they are not constrained by roof orientation, ground-mounted systems can be positioned to maximize sunlight exposure throughout the day.
- Easier maintenance: With ground-mounted systems, maintenance and cleaning of the solar panels are much more convenient compared to rooftop installations.
Limitations
- Space requirement: Ground-mounted systems require a significant amount of open space, making them less suitable for smaller properties.
- Higher installation cost: Due to the added complexity of site preparation and mounting systems, ground-mounted installations generally cost more than rooftop systems.
- Permitting and regulations: Depending on the location, obtaining the necessary permits and adhering to local regulations can be more challenging for ground-mounted systems.
Site Selection And Preparation
Prior to installing a ground-mounted solar panel system, careful site selection and preparation are essential. Here are some key considerations:
- Orientation: Choose a location for the solar panels that receives ample sunlight throughout the day and is not obstructed by shading from trees or buildings.
- Access to infrastructure: Ensure the chosen site has easy access to electrical infrastructure for efficient and cost-effective connection to the grid.
- Ground condition: Assess the soil condition and stability to determine if any additional measures, such as ground reinforcement or grading, are necessary.
Foundation Options For Ground-mounted Systems
Ground-mounted solar panel systems require sturdy foundations to ensure stability and longevity. The following are common options for foundations:
- Concrete footings: Concrete footings provide a solid and durable base for the solar panels. They are often used for larger installations or in areas with challenging ground conditions.
- Screw piles: Screw piles are helical anchors that are screwed into the ground. They offer quick installation and are suitable for various soil types.
- Ballasted systems: Some ground-mounted systems use a ballast, such as concrete blocks or gravel, to provide stability without the need for permanent foundations.
Installation Process And Considerations
The installation process of ground-mounted solar panel systems involves several steps and considerations:
- Panel layout and spacing: Determine the optimal panel layout and spacing to maximize energy production and accommodate any potential shading.
- Mounting system assembly: Assemble the racking and mounting systems according to the manufacturer’s instructions, ensuring secure and precise placement.
- Module installation: Attach the solar panels to the mounting system, making sure they are aligned correctly and securely fastened.
- Electrical connections: Connect the solar panels in series or parallel configurations to ensure proper electrical flow and efficiency.
- Grounding and safety measures: Properly ground the system and install safety features, such as fencing or warning signs, to protect against electrical hazards.
Floating Solar Panel Systems
When it comes to installing solar panels on a shingle roof, one option that has gained popularity in recent years is the use of floating solar panel systems. These innovative systems offer a unique approach to solar panel installation, providing numerous advantages and addressing certain installation challenges commonly associated with traditional methods.
Overview Of Floating Solar Panel Technology
Floating solar panels, also known as floatovoltaics or floating photovoltaics (FPV), are essentially solar panel systems that are installed on bodies of water such as lakes, reservoirs, and canals. The panels are typically mounted on a floating platform, while the electricity generated is transmitted through underwater cables or via a nearby shore connection.
Advantages Of Floating Solar Panel Systems
Floating solar panel systems offer several advantages over traditional rooftop installations:
- Maximized energy production: Floating solar panels can produce more energy compared to their rooftop counterparts. This is because the panels can be positioned to track the sun’s movement, ensuring optimal sunlight exposure throughout the day.
- Reduced land use: As the panels are installed on bodies of water, they make efficient use of otherwise unused space. This can be particularly beneficial in areas with limited available land for solar installations.
- Lower temperature: The cooling effect of the water beneath the panels helps to regulate their temperature, leading to increased efficiency and improved performance.
- Reduced evaporation: By covering water surfaces, floating solar panels can help decrease evaporation rates, thus conserving water resources.
Installation And Maintenance Considerations
Installing floating solar panels requires careful planning and consideration of several factors:
- Site assessment: A thorough assessment of the body of water is necessary to ensure it can support the weight of the panels and withstand environmental factors such as wind and waves.
- Anchoring system: The panels need to be securely anchored to prevent drifting or damage during adverse weather conditions. Various anchoring systems, such as mooring systems or pilings, can be used based on the specific water body and installation requirements.
- Electrical connections: The electrical connections need to be carefully designed and installed to ensure efficient power transmission and minimize the risk of water damage.
- Maintenance: Regular maintenance is essential to keep the panels clean and operational. This may include periodic inspections, cleaning of the panels, and addressing any maintenance issues promptly.
Challenges And Future Prospects Of Floating Solar Panels
While floating solar panel systems offer numerous advantages, they do come with certain challenges:
- Cost: The initial investment for floating solar panels can be higher compared to traditional rooftop installations due to the additional infrastructure required for the floating platforms and anchoring systems.
- Environmental impact: The installation of floating solar panels may disrupt aquatic ecosystems and affect local wildlife. Therefore, environmental impact assessments and proper mitigation measures should be considered.
- Technological advancements: Ongoing research and development efforts are focused on improving the efficiency and cost-effectiveness of floating solar panel systems. This includes the development of advanced materials and designs that can withstand harsh aquatic environments.
In conclusion, floating solar panel systems provide an innovative and environmentally friendly approach to solar panel installations. By maximizing energy production, reducing land use, and utilizing the cooling effect of water, these systems offer numerous advantages. However, careful planning, installation considerations, and ongoing maintenance are crucial for successful implementation. With further advancements in technology and continued focus on sustainability, the future prospects of floating solar panels look promising.

Credit: www.anker.com
Frequently Asked Questions Of How Are Solar Panels Attached To A Shingle Roof
Can You Put Solar Panels On A Shingle Roof?
Solar panels can be installed on a shingle roof by using lag bolts and flashing. The lag bolt is securely attached to the rafters, while the flashing is placed underneath the shingle to prevent leaking. This method ensures that the panels and racking system are tightly secured.
Are Solar Panels Screwed Into The Roof?
Solar panels are attached to the roof using bolts and flashing to secure them to the rafters. This ensures a tight and secure installation without damaging the roof. The process involves drilling holes into the roof to accommodate the lag bolts that hold the panels in place.
What Are The Three Common Ways Of Mounting Solar Panels?
Solar panels can be mounted on a shingle roof using three common methods: lag bolts and flashing, a metal framework called “racking,” or by bolting panels directly to the roof with nails, bolts, and straps.
Are Solar Panels Nailed To The Roof?
Solar panels are not nailed to the roof. The traditional way of installing solar panels involves bolting them to the roof using nails, bolts, and straps. These are driven through the roofing and into the attic or ceiling.
Conclusion
Solar panels can be securely attached to a shingle roof using a lag bolt and flashing system. This method ensures that the panels and racking system are tightly secured to the roof. To prevent any potential leaks, a piece of flashing is placed underneath the shingle.
With this installation technique, homeowners can enjoy the benefits of solar energy without compromising the integrity of their roof. Additionally, this method allows for easy removal and replacement of the panels if needed. Overall, solar panel installation on a shingle roof is a viable and efficient option for harnessing clean energy.